I was recently back in my home town, visiting my family. We decided that it would be fun to get everyone together and have a back porch meal. Basically having dinner around the plastic table my parents have set up on the back porch.
Since my mother was still recovering from her surgery, I put forward my services to make the meal or at least most of it. My mother insisted on at least making the salad.
I on the other hand was in charge of making lasagna for the main course and Chocolate cupcakes for dessert.
I actually started with the cupcakes first. Now I know I usually would show you how I made the cupcakes, but I opted for using a box mix, which is pretty straight forward. But while the cupcakes baked, I started working on the decorations.
I have this great cupcake book kicking around called
Hello, Cupcake
and it's filled with all sorts of cute ideas. Including chocolate melt butterflies.
Since my niece was coming, I thought that making them would be a cute idea.
Here's what I was aiming for:
Now mine didn't turn out quite so pretty, but I gave it my best shot and had fun, and that's what counts, right? I mean I started this blog so that I could learn from my mistakes and I always do.
Making them seemed simple enough, but I'll leave that up to you to decide for yourselves.
Cupcake mix
Eggs and oil for mix (amount of each may vary)
Icing (from scratch or can)
Chocolate melting wafers
Alternate coloured melting wafers
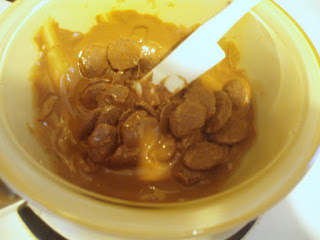
My mom was missing the top pot to her double boiler, so I make-shifted one and used a ceramic bowl. I poured water into the bottom of the pot and then placed the bowl in over top. I then threw in my chocolate melting wafers and turned the burner on low.
Soon enough the wafers started to melt. I stirred them with a small rubber scrapper to help with the melting process and to suss out any wafers that hadn't melted yet.
It didn't take long for them to be fully melted.
Once it was done, I poured it into a sandwich bag and cut the tip off to create a make-shift piping bag.
*Note: This is a great way to ice cupcakes and cookies when using multiple icing colours, not so much for melting wafers. The bag didn't melt, but it was almost too hot to hold and it did hurt my hand with extended exposure. When I try this again, I will for sure use a piping bag instead.
I quickly (because of the burning) piped the outlines of the butterflies and dragonflies onto parchment paper.
The Dragonflies turned out a little better. It was easier to hold as the chocolate started to cool.
Next, I did the same thing with both pink and purple melting wafers.
Once melted, I opted for pouring these instead of piping them.
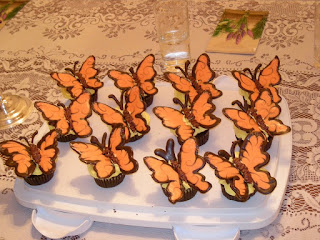
As they were cooling, I iced the cupcakes. Then I peeled the butter/dragonflies off the parchment paper and placed them on top of the cupcakes.
Aren't they pretty? Sort of?
My mom and I also dipped some strawberries in the left over melts
Now, onto the lasagna
I stole this simple recipe from a friend of mine. She makes the best lasagna, but makes it all by hand. I don't have time to ground my own beef or make my own ricotta, so I just buy it from the store
I also would usually put ground beef in the sauce, but since my sister prefers to be a vegetarian most of the time, I opted to leave it out
Spaghetti sauce (homemade or bottled)
ricotta cheese
mozzarella cheese
goat cheese
pre-made soft pasta sheets
oil
I put a little bit of the sauce in the bottom of the dish first, so that the pasta doesn't stick to the bottom. Oil the sheets of pasta lightly. Place ricotta, mozzarella and goat cheese on pasta sheet, covering half.
Next roll the sheet up starting at the cheese end, as if you were making manicotti, and place in the pre-sauced dish.
Top with more sauce and extra mozzarella cheese. Follow the directions on the pasta package for temperature and time.
Enjoy. We certainly did :)
 come in brown, white and green and have cute little palm trees and flowers on them. Also, check out Yellow failing at being a peeping tom!
 , without any of the pesky shredded coconut getting stuck in your teeth! These may be a new favourite of mine from now on.
 . Now I love any type of conversation hearts that you can find. I love picking them out of the pile and reading them all before devouring them. Sometimes you find really funny ones that you can't pass up, like the infamous "beet me" or "give me stuff" so when I saw these I just couldn't pass them up.


