Wednesday, April 10, 2013

House Braeby

I'm not much of a A Song Of Fire And Ice (Game Of Thrones) fan. I've tried reading the books, but I always end up putting them down for something else. I'm currently on the 3rd book for the second time.
I enjoy the show, but part of me still wants to read the books before I watch all of it, so It's gotten put on the back burner as well.

What's this got to do with anything?

Well, I was checking out some of my favorite blogs, (which you can see in the side bar of Talk Star Wars To Me) Geeky Hostess, to be exact, and I came across a Game Of Thrones Family Arms creator.

Now, I love stuff like this.
I went over to check it out and ended up making this


Come on, how awesome is that? I just had to share.

You can make your own here.

Tuesday, April 9, 2013

Saturday Morning Cartoon Birthday Treats

My very awesome boyfriend just turned 30 the other week.
Him and his friends are always throwing theme parties and his birthday was to be no exception to that rule.

But what kind of party to throw?
A Saturday Morning Cartoon Party, of course.

Art by Suppa-Rider

Everyone wore graphic t-shirts of their favorite cartoons, we threw on netflix and watched all sorts of 80's and 90's cartoons; Transformers, She-ra, Power Rangers, G.I. Joe, Sonic The Hedgehog and Jem. It was fantastic.

But what's a theme party without themed food?
We went with a breakfast theme, of course. But what do you make for a breakfast themed birthday cake? I scoured the internet for breakfast cupcakes and came across this amazing recipe from one of my favorite baking blogs; Confessions of A Cookbook Queen
 
picture by Confessions of a Cookbook Queen

Captain Crunch Cupcakes with Peanut Butter Marshmallow Frosting

1 box Duncan Hines Classic Yellow cake mix 1 cup buttermilk 4 large eggs 1/3 cup oil 4 cups Cap’n Crunch cereal, plus more for garnish
Preheat oven to 350. Line 24 muffin tins with baking cups and set aside. Using a food processor or a large Ziploc bag and rolling pin, crush 2 cups of the cereal very finely (to a cornmeal consistency). 


If you don't have a food processor or a rolling pin, an empty wine bottle works just as well. Who knew?


In the bowl of a mixer, add the cake mix, crushed cereal, buttermilk, eggs, and oil. 


Beat on low speed about one minute, stopping to scrape down sides of the bowl. Increase speed to medium and beat 2 minutes more. 

 
Fold other 2 cups on uncrushed cereal into the batter.


Fill liners 2/3 full and bake for 12-15 minutes or until tops spring back when lightly touched. Allow to cool on cooling racks.
 

To Make Frosting:

2 sticks butter, at room temperature (I used salted) 1 cup peanut butter 1 teaspoon vanilla 1/4 cup milk 4 cups powdered sugar 7 oz jar marshmallow creme

In the bowl of a stand mixer, beat the 2 sticks of butter, peanut butter, milk, and vanilla on medium low speed until well blended. 
Slowly add powdered sugar and beat on low until just barely blended. Increase speed until medium and beat for about 2 minutes, until light and fluffy. 

 
Fold in Marshmallow Creme, not fully combining to allow for a swirl of marshmallow throughout.


Frost cupcakes generously and add a sprinkle of cereal to the top.


Note the Spiderman foils. Perfect for a Saturday Morning Cartoon Party.


I'll be honest, I was worried about this recipe. First off, I'm not one to use a box mix. I like making things from scratch, but I couldn't figure out what I needed to change by doing it from scratch, so I went with the box mix. Second, I wasn't sure how good putting cereal into cupcakes would be. But for both accounts, I was wrong. The cereal in them seemed to almost caramelize. Yum!
These cupcakes were AMAZING!!! 
Everyone loved them. 

The other new recipe I tried was bacon related from The Food Network

Candied Bacon
 
12 slices bacon, about 1/4-inch thick
Finely ground black pepper
1/3 cup light brown sugar
Equipment: 2 baking sheets, preferably the same size


Preheat the oven to 325 degrees F.

Put bacon slices in a bowl, season them with pepper and toss with the brown sugar. 
 
 
Cover a baking sheet with parchment or foil and arrange the bacon in a single layer on top. Sprinkle any sugar left in the bowl over the bacon. 


Top with another layer of parchment or foil and top it, squarely, with another baking sheet. The baking sheet will flatten the bacon as it cooks. 
 

Place the tray in the center of the oven and bake for 20 minutes. Check the bacon by lifting the top tray and parchment. If it is not golden brown and fairly crispy, resist the temptation to turn up the oven temperature, and cook it for 10 to 15 minutes longer. Check it again. Keep in mind that when you remove the tray and transfer the bacon to a serving platter or individual plates, the bacon will "crisp" up a little more. Be patient!


My first batch got a little burnt, so I turned it back a bit for the other batches. (sorry, I only got a picture of the burnt batch)
It was really, really good. But by the third batch, the smell of it was getting to me and I didn't end up having more than a few pieces. Of course, there was none left over for me to try again the next day.


Other party foods that we served were mini bagels, berries, pancakes, hash-browns and nutella and peanut butter sandwiches. Sooooooo gooood!!!


Wednesday, December 12, 2012

Tartcuppins - An Experiment Making Mini Piecakens

Oh internet, you show us the most amazing things...

If you're addicted to any social media site, you've probably at one point or another come across what is known as a Piecaken.

No? Well, check it out


Yes, it's a pie baked into a cake. iced with cream cheese frosting.
Delicious or horrifying? You decide

My friend Dave had his birthday party over the weekend and decided that the theme of the party would be dessert. I had mentioned the piecaken to him before and he asked me if I would mind making one for him for the party. After agreeing, we decided that the pie should be cherry and the cake should be chocolate.

Closer to the day, I started to wonder how much of the picaken would get eaten at a dessert party. Knowing that there would most likely be some left over and he would be taking it to work, I thought maybe a less messy and more portable version would be better. I decided to make Tartcuppins instead. Basically tarts in cupcakes.

Now there isn't really a recipe to piecaken/tartcuppins. Everything I found looked like this:

PIECAKEN - By The Shaky Baker
  • Two 9″ round cake pans that are 3 inches deep
  • 2 cake box mixes and the ingredients the box calls for (your choice of flavors)
  • 2 pre-cooked 6-inch pies (your choice of flavors)
  • Buttercream icing (double batch or 2 tubs of store bought)
Take one box cake and make the batter according to instructions.  Pour half the batter in a 9” round cake pan. On top of that, put the first pie. Pour the rest of the cake batter on top of that and bake it according to the box instructions.
Take the next box cake mix and make the batter according to instructions on the back of the box. Pour half the batter in a 9” cake pan. On top of that, put your second pie. Pour the rest of the cake batter on top of that and bake it according to the box instructions.
Once both cakes are done, wait until they cool and then assemble and decorate cake as normal.


I decided to try to do it more from scratch. Although I did take a few shortcuts.
I bought tart shells and cherry pie filling. I know, I know. I would usually make this kind of thing from scratch, but I've never really made pie before and with the cupcakes as well, this didn't really seem like the best time to start.

Now, pre-made tart shells come in those tiny aluminum plates, which wouldn't work too well inside of cupcakes. I had to peel each one off.


Well, actually, I had to bake them first for about 10 mins so that I could actually take them out without breaking them.

my first attempt at removing the foil

I filled them with cherry pie filling and set aside. I used Selections brand (Metro's no-name) and it turned out to be fantastic! I was really impressed.

I used the cupcake recipe from The Devil Made Me Do It And I Liked It. It's still one of the best chocolate cake recipes that I've ever found.

I placed the liners in the cupcake tin and filled them just slightly with cake batter


I then placed the tarts on top of it and pressed them down just slightly


Once placed, I covered them with more of the cupcake batter, making sure to get it down and around the sides of the tarts


And put them in the oven to bake.

Now, with tarts in your cupcakes, it's really hard to get the tops to bake. The heat just didn't rise through the tart as well as I hoped. I had to add on 15 extra minutes and then broil the tops to make them bake properly. I actually ended up burning the tops a bit with the broiler, but just shaved that part off.

For the icing, I made a cherry chocolate buttercream recipe from Kitchen Goddess

3 cups icing sugar
1/3 cup butter, or stick of margarine (softened)
2 teaspoons vanilla
3 ounces baking chocolate, melted. So this is about 3 individually wrapped squares!
3 tablespoons milk to make the end product more spreadable.
Maraschino cherries (juice) (or in my case, pie filling)

I ended up up using a lot more pie filling to give it a really nice cherry flavor.


Finally, I got to cut one open and take a look to see how it worked.


The tart sunk a bit while baking, but it didn't matter, they tasted fantastic! I was actually really impressed.

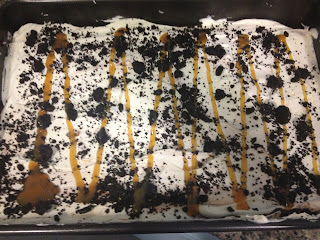
Also, for the party, Adam made an Oreo Fluff Cake!
(And I managed to get his recipe and a few pictures while he made it)

1 package of Oreos
1/2 cup of butter
1 (113ml) box of chocolate pudding
1 1L tub of Cool Whip
1 cup of cream cheese
1 cup icing sugar

1. Crush oreos with a food processor or in a bag with a rolling pin. Set aside 1/2 cup to sprinkle on top when finished.
2. Pour remaining crumbs into a 13x9 cake pan.
3. Melt butter and pour over crumbs in cake pan.
4. Stir butter and crumbs together and spread to evenly coat the bottom of the pan.
5. Prepare chocolate pudding according to its provided recipe.


6. In a mixing bowl, blend the cream cheese until smooth.
7. Add the powdered sugar to the cream cheese. Mix well.
8. Add 1 cup of Cool Whip to the cream cheese. Mix well.
9. Pour the cream cheese mixture evenly over the oreo cookie crust. Smooth with a spatula.


10. Pour the chocolate pudding evenly over the cream cheese mixture. Smooth with a spatula.
11. Add a layer of Cool Whip on top of the pudding, smoothing as necessary.
12. Sprinkle the Cool Whip with the cookie crumble set aside in Step 1.


13. Garnish with whatever! I used caramel! 
(yes he did! And it was totally awesome)


The party was great and the desserts went over extremely well. I'm pretty sure Dave is in a sugar coma now, but probably doesn't care.

I will totally try this recipe again and I hope that you give it a shot too. It's worth it.
As always, if you do try this out, let me know how it goes and what you did to make it better/your own.

Wednesday, October 17, 2012

Geek Cookie Stamps

Ever feel like your cookies aren't geek enough? Don't have time, energy or skill to painstakingly ice them into geek things? If you answered yes (which I totally have recently) then these cookie stamps are for you!

Totalum cookie stamps are awesome! Easy to use and lots if geek variety.

Star Wars


Harry Potter


Pacman


Batman


Star Trek


Avengers


Game Of Thrones


even Hunger Games!!


I can't decided which ones I like best, I guess I'll have to buy them all! Which ones do you like? What designs would you prefer to see? Drop me a line and let me know

Tuesday, June 12, 2012

Geeky Kitchen

I've been looking around lately for geeky stuff for my kitchen. Since I will soon have a different kitchen in which I can decorate as I please, I was thinking about giving it a geek motif.  But to do that, there are some things that I would need.


How amazing are these! I would totally serve food on these. They're dishwasher safe as well!


I'm not sure why they picked these 2, but I think it's pretty awesome. My only problem would be deciding who's the salt and who's the pepper. I'd probably put salt in the Hulk, since he looks like he holds more and I don't use a lot of pepper.


I love how these fir together. Although it might look funny with my Star Wars plates.


I would prefer it to say Baking Dawn ;)


Every geek needs a Pi Plate


Wonder Woman Mixer

sadly these are only available in Brazil :(


And last but not least


I would totally make chocolate in them too!


So, what kind of geeky things do you have in your kitchen?

Thanks to That's Nerdalicious! and Stellar Four for wanting to help make my kitchen awesome